What is a click through demo?
A click-through demo is an interactive product walkthrough you can keep in your repo, update with an AI coding agent, and ship without re-recording after every

What is a click-through demo, and why do the good ones live next to your product code instead of inside a vendor's SaaS? The short answer is "a clickable walkthrough," but that misses the useful part: an interactive product demo you own, can update with an AI coding agent, and do not have to rebuild from scratch every time the product ships.
What a click-through demo is in plain English
The simplest definition that still holds up
A click-through demo is a guided, interactive walkthrough of your product, a series of screens the buyer advances through by clicking, with each step showing one action or outcome. No video. No live product state. Just a self-contained flow the buyer can move through at their own pace.
For builders, the useful version is the one where that walkthrough is an artifact you own: HTML and assets that live in your repo, written and maintained by your coding agent (Cursor, Claude Code, Codex), not a recording stuck inside someone else's platform.
That file tree is the demo. Not a video clip, not a hosted recording. An artifact your agent can diff, edit, and regenerate.
What makes it different from a recording
A video with hotspots on top is still a video. A click-through demo is a flow: each step is a discrete state the buyer moves into. That structure is what makes it editable. Change step 2, and the rest of the flow stays put. PostHog's marketing analytics docs track click-through rate as clicks ÷ impressions; a click-through demo uses the same basic interaction, except the "impression" is a product step, not a page.
Where a click-through demo beats a video tour, sandbox, or free trial
The comparison that actually matters
Each format has one job it does well. A click-through product tour is the right tool when the buyer needs to understand what the product does before they are ready to touch it.
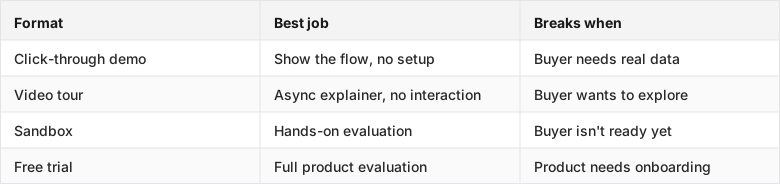
The click-through demo wins on the middle step of the buyer journey, after "what is this?" and before "let me try it." It shortens the path to the aha moment without requiring real product state or a sales call.
When the demo should lose
A click-through demo is the wrong format when the buyer needs to evaluate with their own data, test an integration, or understand a complex workflow that branches in ways a guided flow cannot show. Deep technical evaluation belongs in a sandbox or trial. A buyer who is already sold and just needs to test the API does not need a guided tour. They need access.
Why code-owned click-through demos stay aligned with the product
Why vendor-locked demos age badly
The problem is simple: your product ships from your repo, but the demo lives in someone else's SaaS. Every meaningful UI change creates a gap between the two. On a screenshot-based tool, a nav restructure means recapturing every affected screen. There is no in-place layout edit. The demo and the live product stop matching, and the next viewer sees old UI.
This is not really a workflow problem. It is an ownership problem. The demo is an artifact maintained by a vendor's editor, not by the same toolchain that maintains your product.
What changes when the demo lives next to the code
A code-owned demo changes the update model entirely. When the product ships a UI change, you re-prompt your agent against the existing demo code. The agent edits the affected step, leaves the rest alone, and the demo reflects the current product.
Before (vendor-locked):
- Nav label changes from "Projects" to "Workspaces"
- Open the SaaS editor, find every screen with the old label
- Re-capture or manually edit each one
- Re-publish
After (repo-native):
One targeted edit. No re-capture pass. The Vercel community shows this pattern in practice: a working deployed demo shared alongside the article, not a static screenshot that aged the day the UI moved.
How to build a click-through demo with an AI coding agent
Start with the path, not the polish
Pick one buyer flow, the shortest path from "what is this?" to the moment the product proves its value. That aha moment is the target. Everything in the demo exists to get the buyer there without detours.
Do not start with styling. Start with the step sequence:
- Define the aha moment in one sentence ("buyer sees a report generated from their data in under 30 seconds")
- List the minimum steps to reach it, usually 4–7
- Write a one-line description of each step
- Hand that to your AI coding agent as the prompt
The agent scaffolds the HTML, wires the step routing, and produces a clickable first version. Styling comes after the flow is right.
The minimal repo shape
The demo needs four things in the repo: an entry point that handles routing, one HTML file per step, a shared stylesheet, and a config file for copy and CTA. That is it. The config file is what makes the demo branchable. Swap the config for a new customer, and the flow stays the same.
What Cursor or Claude Code does here
An AI coding agent handles three jobs in the demo lifecycle:
- Creation: scaffold the step files, wire the routing, generate copy from your step descriptions
- Updates: edit the affected steps when the product changes, targeted, not a full rebuild
- Variants: swap the config (logo, copy, sandbox data, CTA) to produce a per-customer version off the same base
The human review before shipping is simple: does the aha moment still land? Does the flow match the current product? The agent handles the authoring; you handle the judgment call. Anthropic's Claude Code documentation covers the agentic loop that makes this practical for small teams without dedicated demo ops.
How to update the demo when the product ships a new flow
The maintenance loop in three moves
- Detect the change — what UI or copy changed in the product? Which demo steps show that element?
- Update the source — re-prompt your agent against the affected step files with the specific change
- Check the aha moment — walk the updated flow and confirm the buyer still reaches the intended outcome
That is the full loop. No re-record, no re-capture pass, no opening a SaaS editor and hunting for stale screenshots.
What you do when one step changes
Say your product renames a button from "Generate Report" to "Run Analysis." On a screenshot tool, every screen showing that button is its own re-capture job, so the effort grows with however many steps reference it. In a repo-native demo, the change is one targeted prompt:
One line, one step, done. The rest of the flow stays put.
Where to put a click-through demo so people actually use it
The homepage embed that earns its keep
The demo belongs near the top of your site when the goal is self-serve understanding, especially when visitors arrive from search or word-of-mouth and need to understand what the product does before they are willing to sign up. A homepage embed works when the demo is short, under 6 steps, starts immediately without a form gate, and shows the aha moment before the fold on most screens.
If the demo needs a 30-second explainer before it makes sense, it is too long or starts too deep in the flow.
The follow-up send that gets opened
The sales leave-behind case is different: a short, buyer-specific demo sent after a call. The buyer already knows what the product is. They need a concrete path to share with their team. A click-through demo in a follow-up email works because it gives the recipient something to move through, not just a paragraph to read. Stripe's Sessions 2021 keynote used embedded product demos alongside feature announcements for exactly this reason. The interactive element does the explaining the copy cannot.
Keep the follow-up version to 4–5 steps, start at the moment the call ended, and end with one clear CTA.
Measure click-through demo performance beyond clicks
The metrics that matter more than view count
Demo analytics worth tracking:
- Completion rate — what percentage of viewers reach the last step?
- Step drop-off — which specific step loses the most viewers?
- Step replays — which steps do viewers re-click? Confusion or high interest, the context tells you which.
- Aha-moment reach — did the viewer get to the step you defined as the payoff?
View count tells you the demo is being seen. Completion and drop-off tell you whether it is working.
What to change when people get lost
A drop-off spike at step 3 of a 7-step demo usually means one of three things: the step is too abstract, it shows a feature the buyer does not recognize yet, or the copy points at the wrong thing. The fix is almost never "add more steps before it." It is usually "cut to the aha moment faster" or "rewrite the step label so the buyer knows what they are looking at."
If viewers keep replaying step 5, that is probably the real aha moment. Move it earlier.
Where Inkly comes in
The problem this article describes is not really a workflow problem. It is an ownership problem. The demo lives in a vendor's SaaS, so every product change means opening their editor, finding the stale screens, and recapturing or manually patching them. The demo and the codebase are two separate things maintained by two separate tools, and they drift apart every sprint.
The kind of tool that solves this is one where the demo is code, code that lives next to your product and is written by the same agent that edits your app. That is what Inkly is built on. You capture screens or prompt the agent directly; the output is HTML you own, in your repo, editable by Cursor, Claude Code, or Codex. When the product ships a UI change, you re-prompt the existing demo code. No re-record, no SaaS editor pass. When a new customer wants a branded variant, you re-prompt off the same base. The three-prompt loop, create, update, produce variants, replaces the three things that historically made demos expensive to maintain. The tradeoff is plain: you need a coding agent already set up. If you are not in a repo workflow yet, a capture-first tool like Supademo is the faster starting point. If you are, demos as code you own is the lower-maintenance path from the first update onward.
FAQ
Q: What is a click-through demo in plain English, and how is it different from a video tour, sandbox, or free trial?
A click-through demo is a guided, interactive walkthrough of your product, a series of screens the buyer advances through by clicking. It is not a video, not a sandbox, and not a free trial. The buyer moves through a fixed flow at their own pace, which makes it faster than a trial and more interactive than a recording.
Q: When is a click-through demo the right format for a sales or marketing team, and when is it not?
It is the right format when the buyer needs to understand what the product does before they are ready to evaluate it hands-on, the middle step between "what is this?" and "let me try it." It is the wrong format when the buyer needs to test with their own data, evaluate a complex branching workflow, or do technical due diligence. Those jobs belong to a sandbox or trial.
Q: What is the fastest way for a founder or product engineer to build one without re-recording every release?
Build it as code in your repo, HTML steps, a shared stylesheet, a config file for copy and CTA, and maintain it with an AI coding agent. When the product changes, re-prompt the agent against the affected step files. No re-capture pass, no SaaS editor. The repo-native path trades a small amount of initial setup for much lower rework on every later release.
Q: How can an AI coding agent help create or update a click-through demo?
The agent handles three jobs: scaffolding the initial step files from your flow description, editing specific steps when the product changes, targeted, not a full rebuild, and producing per-customer variants by swapping the config. Human review is still required before shipping, specifically, confirming the aha moment still lands and the flow matches the current product.
Q: What should the demo include so buyers reach the aha moment quickly without getting lost?
One job, one outcome, and the minimum steps to prove it, usually 4–7. Define the aha moment first ("buyer sees X happen in under 30 seconds"), then work backward to the minimum flow that gets there. Cut anything that does not directly serve that moment. If a step needs explanation before the buyer knows what they are looking at, either rewrite the step label or cut the step.
Conclusion
A click-through demo is useful because it is owned, editable, and regeneratable, not because it is interactive. The format only pays off when the demo can move with the product instead of aging beside it. This week: sketch one buyer flow, define the aha moment in one sentence, and put the demo in your repo instead of another vendor dashboard. The first update will tell you whether the ownership model was worth it.
See the Inkly demo agent in action across the full product.
Ship your next demo before the meeting starts
Interactive demos built from your real product and kept current as you ship, done for you.


