AI storyboard for product demos
Turn a product page into an ai storyboard for product demos, map claims into scenes, hand it to a builder, and keep it synced when the UI changes.

Ship a feature every week for a quarter and your demo storyboard goes stale roughly thirteen times. Every refresh costs you a rebuild pass, and most of that work ships nothing new. An ai storyboard for product demos fixes that before the cycle starts: you turn the product page into a scene plan first, then hand it to an agent or engineer to build. The output is code-native. It is a storyboard your agent can use directly, not a Figma file someone has to interpret again.
Start the ai storyboard for product demos with the product page, not a blank canvas
Most demo storyboards start with a blank frame and a vague brief. That is why they take three rounds of revision. The product page already has the basics: the headline claim, the feature proof, the social proof, and the user job the product solves. Read it as raw material, not as marketing copy.
Pull the claims, proof, and audience cues out first
Open the product page and break it into three buckets before you sketch a single scene:
- Claims — every headline and subheadline that makes a promise ("Ship demos in minutes," "No re-recording after updates").
- Proof — logos, testimonials, metrics, screenshots that back the claim.
- Audience cues — the job the page implies the user is trying to do ("You're a founder who needs a pitch-ready demo fast").
Take Linear's homepage as a reference: the headline claims speed and focus, the feature blocks prove it with workflow screenshots, and the audience cue is embedded in the copy ("built for product teams who move fast"). Three buckets, three minutes of reading, and you have the raw input for your product demo storyboard.
Turn the page into a scene inventory
Each bucket maps to candidate scenes. A claim becomes an opening scene that states the promise. A proof block becomes a mid-demo scene that shows the evidence. The audience cue becomes the framing line on the first screen.
Take Linear's "ship faster" claim: Scene 1 is the dashboard view that shows a sprint in motion. Scene 2 is the keyboard shortcut flow that proves speed. Scene 3 is the completion screen with a metric. You have not invented anything. You have read the page.
Map product claims into scenes the demo can actually show
Once you have the scene inventory, the next job is deciding what each scene actually does. This is where most ai storyboard for product demos workflows fall apart: scenes try to carry two or three claims at once and the demo gets muddy.
One claim, one scene
A scene that says "we're fast, we're affordable, and we integrate with Slack" says nothing. The viewer holds none of it. The failure case is a dashboard scene that shows five features at once. The viewer is clicking through a UI tour, not understanding a product.
One claim per scene is a constraint, not a preference. It forces you to decide which claim matters most for this viewer at this moment in the demo.
When a claim needs proof and when it only needs motion
Not every claim needs a full UI action to land. Some claims need visible proof — a user completing a task, a metric appearing, a form submitting. Others only need a transition or a tooltip to register.
"Connects to your existing tools" lands with a tooltip on an integration icon. It does not need a full OAuth flow walkthrough. "Cuts setup time by half" needs a before/after screen pair, not a tooltip. Match the step type to what the claim actually requires, not to what looks impressive.
Use the story arc the page already implies
Most product pages follow the same arc: opening promise → feature proof → social proof → CTA. That arc is already a demo script. Map it directly:
- Opening promise → Scene 1: the problem state or the "before" screen
- Feature proof → Scenes 2–4: the core workflow, one claim per scene
- Social proof → Scene 5: a metric or customer quote overlaid on the UI
- CTA → Final screen: one next step, one button
Vercel's blog on how Mux ships durable video workflows shows this arc in a technical context — storyboard thumbnails and scene sequences used as structured inputs to an AI pipeline. The same logic applies to a demo: the storyboard is a structured input, not a sketch.
Choose the right step types for an ai storyboard for product demos
Step type is the decision that separates a demo that flows from one that stalls. An interactive demo storyboard needs to specify step type for every scene, not as an afterthought, but as part of the scene definition.
Use modals when the scene needs a decision
A modal stops the viewer and forces a choice. Use it when the scene asks the viewer to decide something: "Start a new project" or "Connect your first integration." If the scene does not require a decision, a modal is friction, not clarity. The same moment — say, explaining a settings panel — works better as a hotspot the viewer can click at their own pace.
Use tooltips and hotspots when the UI should keep moving
Tooltips and hotspots let the viewer stay in the flow while absorbing a small cue. Use them for feature callouts, label explanations, or secondary actions that support the main claim without interrupting it. A tooltip on a filter icon that says "Filter by assignee or priority" takes two seconds and keeps the demo moving. A modal for the same information adds a dismiss click and breaks rhythm.
Use transitions to connect claims without bloating the demo
A transition carries the viewer from one claim to the next without adding a scene. When two claims are adjacent in the narrative — "set up in minutes" followed by "your first project is ready" — a transition is the right connector. No extra screen, no extra click, no extra copy. The transition says "and then" without making the viewer do anything.
Same feature, three treatments: a "real-time sync" claim can be a modal ("Your changes are live — see them here"), a tooltip ("Syncing now" on a status indicator), or a transition (screen flips from draft to published state). The right choice depends on where the viewer is in the arc and how much weight the claim needs.
Write each storyboard step like a handoff the builder can trust
A storyboard that looks clear to the person who wrote it often collapses the moment someone else tries to build from it. The fix is a consistent step structure that removes interpretation.
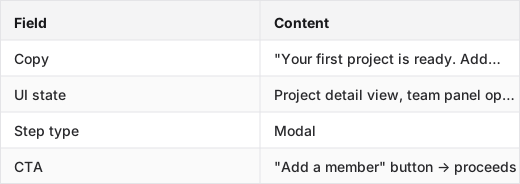
Give every step four fields
Every step in the product demo storyboard needs exactly four things:
- Copy — the text the viewer reads on that screen. Headline, tooltip label, button text. Not a vague description — the actual words.
- UI state — what the interface looks like at this moment. Which panel is open, which field is filled, which item is selected. Be specific enough that a builder can reproduce it without guessing.
- Step type — modal, tooltip, hotspot, transition, or screen. One per step.
- CTA — what the viewer does next. Click, scroll, dismiss, or proceed. If there is no CTA, the step is passive and probably belongs inside a transition.
Miss one field and the handoff gets sloppy. A step with copy and step type but no UI state means the builder has to decide what the screen looks like, and they will decide wrong half the time.
Keep the language tight enough for engineering
Marketing writes "show the user how powerful the dashboard is." Engineering needs "Dashboard screen, all projects view, filter set to 'Active', no items selected. Tooltip on the filter icon: 'Filter by status or assignee.' CTA: click filter icon to proceed."
Write storyboard notes at the second level of specificity. Not a vague brief, not a full design spec. Just enough that the builder knows exactly what to render and what the viewer does next.
Sample storyboard row:
Hand the ai storyboard for product demos to an agent or engineer without losing the plot
A finished storyboard is a structured prompt. The builder — human or agent — should be able to read it top to bottom and know exactly what to build, in what order, with what UI state at each step.
Build from the storyboard, not around it
The storyboard is the source of truth. The builder's job is to render each scene as specified, not to interpret the intent behind it. When builders improvise from a vague brief, the demo drifts from the product narrative. When they build from a four-field storyboard, the demo matches the plan.
This is also what makes the ai storyboard for product demos approach agent-compatible. A coding agent like Cursor or Claude can use a structured storyboard directly — scene name, UI state, copy, step type, CTA — and produce the corresponding demo code without a second planning layer.
Reuse existing assets before you create new ones
Before the builder starts from scratch, check what already exists: current product screenshots, prior demo recordings, existing marketing assets. A screenshot of the dashboard in the right state is faster than capturing it again. A prior demo scene that matches the storyboard spec can be adapted rather than rebuilt.
Give the agent a prompt that names the scene, not the vibe
Vague prompt: "Build a demo that shows how fast our onboarding is."
Concrete prompt: "Build Scene 3: Onboarding complete screen. UI state: user has completed setup, confetti animation, 'Your workspace is ready' headline visible. Step type: transition from Scene 2. CTA: 'Explore your dashboard' button, links to Scene 4."
The agent needs the scene name, the UI state, and the CTA. Everything else is decoration. PostHog's session replay setup shows the same principle in a different context — structured state inputs produce reliable outputs; vague inputs produce guesswork.
Keep the ai storyboard for product demos synced when the UI changes
A storyboard that never gets updated becomes a problem faster than a demo that never gets updated. The storyboard is the source of truth. When the product changes, the storyboard changes first.
Update by scene, not by restarting the whole plan
When a feature ships a UI change, find the affected scenes in the storyboard and update only those steps. A nav rename that affects Scene 2 does not require rewriting Scenes 4 through 7. Scene-level ownership keeps the maintenance cost tied to the actual change.
This is the payoff of the four-field structure: you know exactly which field changed (UI state, copy, or CTA), and you update that field in that scene. No file dump, no full re-plan.
Review the storyboard after each meaningful product change
Not every commit triggers a review. The trigger is a release that alters a claim, a UI state, or the order of the narrative. A button label change in Scene 3 is a field edit. A feature that moves from step 2 to step 4 in the user workflow is a scene reorder. A new proof point on the product page is a new candidate scene.
Keep a changelog note next to each release that flags which storyboard scenes are affected. One UI change, one scene update, nothing else touched.
FAQ
Q: How do you turn a product page or product narrative into a storyboard for an interactive demo?
Strip the page into three buckets — claims, proof, and audience cues — before sketching any scenes. Each claim becomes a candidate scene, each proof block becomes a mid-demo scene, and the audience cue becomes the framing on the opening screen. The page already has the narrative; the storyboard job is to make it explicit and ordered.
Q: What should each demo storyboard step include: copy, UI state, step type, and CTA?
Yes — those four fields, every step, no exceptions. Copy is the exact text the viewer reads. UI state is the specific interface condition the builder needs to reproduce. Step type is modal, tooltip, hotspot, or transition. CTA is what the viewer does next. A step missing any one of these forces the builder to guess, and they will guess wrong.
Q: How do you decide which product moments deserve their own scene or step?
One claim, one scene. If a moment carries more than one claim, split it or cut one. The cost of over-splitting is a demo that runs too long; the cost of under-splitting is a scene that communicates nothing. When in doubt, ask: what is the single thing the viewer should understand after this screen? If the answer has an "and," split the scene.
Q: How do you keep the storyboard on-message for marketing while still accurate enough for product and engineering?
Marketing owns the narrative layer — the claims, the copy, the arc. Product and engineering own the UI truth — the UI states, the step types, the CTA targets. The four-field structure keeps that boundary clear: marketing writes the copy field, engineering writes the UI state field. Review disagreements usually live at that seam.
Q: How do you hand off a storyboard to a builder or engineer so it can be implemented efficiently?
Give them the storyboard as a structured document — one row per scene, four fields per row — and tell them to build from it without interpreting intent. The first thing the builder should see is the scene name and UI state, not a brief. If you are handing off to a coding agent, write the scene prompt with the scene name, UI state, step type, and CTA explicitly named. The agent does not need context it was not given.
Conclusion
A product page already contains the claims, proof, and narrative arc of a working demo. The storyboard job is to make that structure explicit before anyone starts building. Pick one product page, extract five scenes using the four-field format, and hand that outline to an agent or engineer this week. The demo built from a structured storyboard stays accurate longer, updates faster, and costs less every time the product ships, which, if you are shipping weekly, is the math that matters.
Explore what the Inkly demo agent can do beyond a single demo.
Ship your next demo before the meeting starts
Interactive demos built from your real product and kept current as you ship, done for you.


